
MongoDB BI Reporting using EasyMorph ETL

EasyMorph is an ETL tool that allows users to quickly set up data extraction and processing pipelines with a simple to use drag-and-drop interface. Additionally, it allows scripts to be automated using its own scheduler service which is really useful for an automated BI reporting environment.
EasyMorph has a lot of in-built database connection drivers which makes it ideal for aggregating data from multiple sources. In our production environment, we use MongoDB as a convenient data store for archiving data so that our transactional database running on PostgreSQL can run as leanly and efficiently as possible.
Recently, we needed to pull data from both the PostgreSQL and MongoDB instances so that we could generate reports on both our live and archived data. As of today, EasyMorph does not have a native MongoDB connector, so we had to figure out a way of connecting to our MongoDB instance using the provided ODBC driver. Adding to the complexity, our MongoDB instance is on a private network which can only be accessed via SSH.
Pre-Requisites
Before starting, the following software needs to be downloaded and installed:
- The MongoDB bi-connector, which provides the following:
- mongosqld.
- mongodrdl.
- The MongoDB ODBC driver.
- The Windows ODBC driver.
- Bitvise.
Port Forwarding
The first issue encountered is that mongosqld doesn't provide the functionality to connect to the MongoDB instance over SSH, so we need to use a reverse SSH tunnel to port forward the MongoDB instance on the remote server to a local port. One of the considerations is that we want the connection to be available on startup automatically so that we don't have to manually fix the connection each time the server is rebooted. To achieve this, we decided to use Bitvise as it's quite easy to set up and provides quite a few options for running it as a windows service.
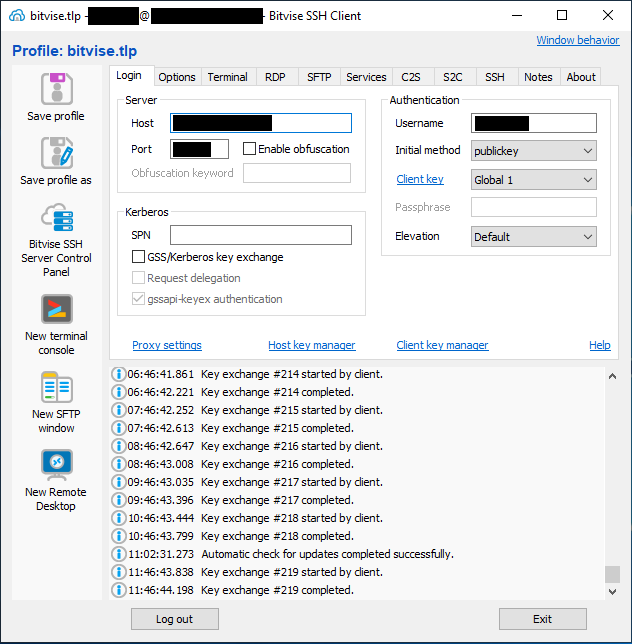
After installing Bitvise, you can proceed to set up the initial SSH connection and check that this step is working. We recommend using an RSA key pair and a user account specific to the reporting server for increased security. The initial SSH connection setup should look like the following:
Once that's working, you can proceed to set up the port forwarding via reverse SSH tunnel. For this step, you can navigate to the C2S tab of Bitvise and enter the following information:

Here we've mapped the MongoDB port 27017 on the remote server to our localhost on port 2345. Any local host port can be selected as long as it's not a port currently being used by another service or application. You'll then want to save the profile and take note of where it is located.
Finally, to set up Bitvise to startup on boot, navigate to the startup folder located at:
C:\Users\{user}\AppData\Roaming\Microsoft\Windows\Start Menu\Programs\Startup
Create a shortcut to the Bitvise executable file, and modify the target to:
"C:\Program Files (x86)\Bitvise SSH Client\BvSsh.exe" -profile="C:\Users\{user}\Documents\ssh\bitvise.tlp" -loginOnStartup
Mongosqld Connection
The next step is to set up mongosqld which will connect to the instance available on the local host port. The mongosqld driver can be configured via CLI, but since we'll be wanting to run this on boot as well, we'll create a yaml file which will hold the configuration. The following yaml file is used:
There are a few things to note here. The first is that the MongoDB connection string must use the same port as the one that was set up in Bitvise. Here we also recommend creating a read-only MongoDB user for the reporting server.
The second is that since we'll be running this in the background as opposed to the CLI, the "systemLog" path needs to be specified. Make sure the path is valid and can be written to otherwise mongosqld will fail to start.
Finally, the SQL language needs a schema to be able to perform queries against. There are two ways to achieve this, either manually specify a schema that maps to the objects stored in your MongoDB instance, or alternatively, let mongosqld randomly sample 1000 objects within your database and generate a schema based on the sampled entries. In this case, we'll be using the sampling technique. By default, mongosqld stores the sampled schema in memory, but if we want to persist it (and potentially edit it later), we'll want to store it in a separate database inside MongoDB. You, therefore, need to create a database that will hold the schema and add the name of the database under {schema_db} in the gist above. At this point we should be ready to test the mongosqld configuration by CLI using the following command:
"C:\Program Files\MongoDB\Connector for BI\2.14\bin\mongosqld.exe" --config "C:\Users\{user}\Documents\mongo\mongosqld.yaml"
Once the above command is running without errors, check that the sampled schema has been created in your MongoDB instance. Before doing the next step, you'll want to edit the yaml file and change the key "schema.stored.mode" to "custom" so that the saved schema doesn't get overwritten every time mongosqld is restarted. The updated schema entry will now look like this:
schema:
    stored:
        source: "schemas"
        mode: custom
        name: "{schema_db}"
We're now ready to set up mongosqld as a windows service so that when the reporting server is restarted the connection will be established automatically. From a cmd prompt running as administrator, you can run the following:
"C:\Program Files\MongoDB\Connector for BI\2.14\bin\mongosqld.exe" install --config "C:\Users\{user}\Documents\mongo\mongosqld.yaml"

net start mongosql
ODBC Data Source Name
Once the MongoDB connections have been set up, we're ready to set up an ODBC Data Source Name (DSN) which will allow you to pull data from the MongoDB data source using ODBC. After the Windows ODBC driver has been installed, launch the "ODBC Data Source (64-bit)" application. Navigate to the "System DSN" tab and press the "add" button. You should have the option to either use the MongoDB Unicode or the MongoDB ANSI drivers. The ANSI driver is known to be more performant but can have issues with certain characters that could be present in your data so pick the one that best suits your use case. The setup page should look like this:
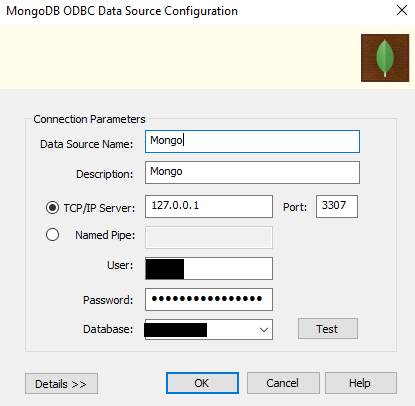
Here you'll need to use the same port that was configured in the mongosql yaml file under the "net.bind" key.
Connecting via EasyMorph
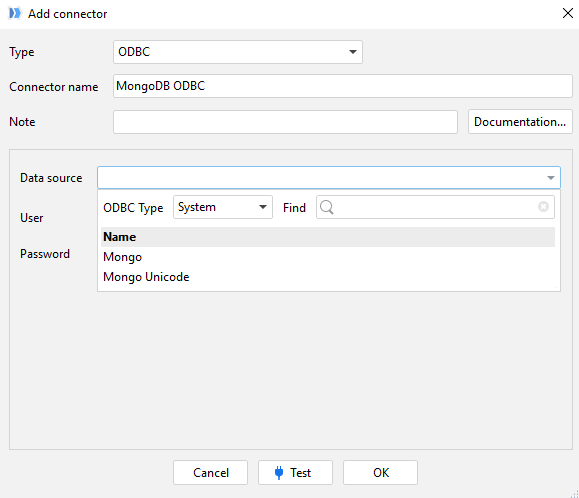
After all the previous setups have been completed and tested, we're now finally ready to start pulling the data in EasyMorph. Open up EasyMorph, and click on "add a new connection". You'll then need to select the ODBC driver. If you followed the steps shown previously, the "Data source" dropdown should now show the DSN options you created using the "ODBC Data Source (64-bit)" application. The EasyMorph connection setup should look like the following:
At this point, you're ready to start pulling data straight from MongoDB, and EasyMorph will automatically pick up the mongosql schema that was saved in your schema database. Keep in mind that you can make edits to the schema JSON objects to suit your data requirements which EasyMorph will automatically pick up.
