
An Introduction to Kubernetes
Part One: Starting Out
Recently I decided to try my luck at learning Kubernetes - a wild and wonderful Devops tool that allows for smooth, automated deployments and easy scaling up and management of applications. However, such a task is not an easy feat to accomplish when there are thousands of places to start and the direction in which you're going is fuzzy to say the least. This article will hopefully guide you in the right direction when starting out and get you comfortable with some of the basics of Kubernetes. Ideally once you're finished with part one of this series, you will be able to:
- Set-up a sandbox environment for local development with minikube.
- Create and apply a deployment using a basic hello-world image.
- Create a service to expose your deployment on localhost.
I do not claim that this tutorial is the best or most effective way to get going with Kubernetes, but it's where I started. I provide some links to resources along the way so that you know where my info came from.
Let's get going!

Outline
Prerequisites
To get going with Kubernetes and this tutorial, there are a couple of things that you need to have covered. Kubernetes is a container management system which means you need to know quite a bit about containerizing applications. The most popuplar and most stable container engine is Docker. Alternatives such as rkt are available for those interested in exploring container software more. From here on, I will refer to Kubernetes as K8s. You also need to understand a bit about network communication to an application (for example, using a reverse proxy).
Along with this tutorial, I would really recommend having access to the following resources either for a quick reference or for more thorough reading.
- K8s Documentation
- Kubernetes in Action - Marko Lukša
- Get Started with Kubernetes Using Minikube - Bitnami
- Learn Kubernetes in Under 3 Hours: A Detailed Guide to Orchestrating Containers - Rinor Maloku
Some obvious requirements that I think are worth mentioning are time and patience. Debugging and solving seemingly simple problems in a K8s cluster can be tedious and frustrating. However, there is an overwhelming amount of documentation available from different sources and there's a 99% chance that your problem has been solved before or that you're missing a step in your setup.
Finally, I'm going to be doing this tutorial using Ubuntu 19.04 although I'll do my best to make it platform agnostic. You will need Docker installed before continuing. On a side note, if you want to check out some cool ways of setting up Docker on Windows, take a look at Setting up Vagrant Ubuntu VM (VirtualBox Provider) to run Docker Compose Node + Angular 6 Project with File Change Detection on Windows Host. If that's not your thing, consider moving to Linux :P
Background
If you want to skip straight to the juice, you're more than welcome to jump to Setting Up Locally. This section covers what Kubernetes actually is and some useful terms and catchphrases that give context to running your application with K8s.
Kubernetes is a project that was open-sourced by Google in 2014 and is now hosted by the Cloud Native Computing Foundation. The platform is ultimately a single master resource and one or more nodes working together to keep a containerised application up and running. The nodes are virtual machines or physical computers that do the grunt work of running containers. The master is a collection of processes, usually on a single machine, which manages the cluster. The nodes run processes to communicate with the master and handle network communication.
But how do you actually get your application running with Kubernetes? Basically you tell the master what your desired system looks like and the master works to replicate what you've requested using the resources available - be it using 1, 3 or 100 nodes. Your blueprint will define the container images to use, the number of replicas of a container to run, the type and size of storage that is needed, network-related configuration and other similar specifications. The desired state is described using different K8s objects and you can manage the desired and actual states of your application by communicating with the master node via the kubectl cli.
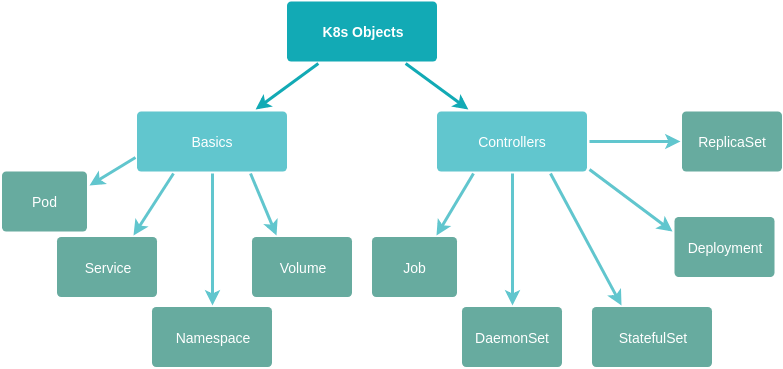
Kubernetes Objects
We'll get into how to define and use some of these objects soon. The nitty-gritty of how Kubernetes actually implements the desired state on one or more nodes is beyond the scope of this article. The beauty of K8s is that it abstracts the complexity of managing the hardware resources that you require and allows you to focus on managing your software. When we play around with Kubernetes locally, we'll use minikube which brings up a VM locally with a single node and master. For production applications, most hosted servers such as Google Cloud and Amazon Web Services have their own implementations to interface with Kubernetes. There's also the bare metal implementation which allows you to set up a cluster from scratch where you also allocate the physical resources on which K8s runs. A full list of solutions can be found in the official documentation.
Setting Up Locally
To get started, we will need some tools that allow us to run a cluster locally. These are:
- A hypervisor - a virtual machine manager to start and handle a VM
- Kubectl - the cli needed to manage applications with K8s
- Minikube - the single node implementation of K8s
The hypervisor can be ignored on Linux machines if you have Docker version 18.09+ installed. To illustrate the hypervisor setup, I'm going to go ahead and use VirtualBox 6.0.0. The download and installation instructions are straightforward with binaries available for all major operating systems. You can run virtualbox --help from a terminal to check that the installation was successful. You might want to also check that virtualisation is enabled in your computer's BIOS. For example, in my BIOS options I can check that virtualisation is enabled under Security > Virtualization > Intel (R) Virtualization Technology and Intel (R) VT-d Feature.
Next we install kubectl and minikube. On Ubuntu, you can run:
curl -Lo minikube https://storage.googleapis.com/minikube/releases/latest/minikube-linux-amd64 && chmod +x minikube && \
sudo cp minikube /usr/local/bin/ && rm minikube
kubectl version
minikube version
If everything has been installed correctly, you should see some details about the kubectl version and the minikube version. If you get a lengthy output when checking the kubectl version that appears to contain an error, don't stress too much at this stage. It is likely because you don't have a cluster running yet for kubectl to check the server version. On Windows and macOS, you can use Chocolatey and Homebrew respectively (see the installation docs for kubectl and minikube).
Finally, we're ready to start our first cluster with:
minikube start --vm-driver=virtualbox
It will probably take a few minutes to get this running, but once done, you can run kubectl cluster-info and you should see something like:
Kubernetes master is running at https://192.168.99.101:8443
KubeDNS is running at https://192.168.99.101:8443/api/v1/namespaces/kube-system/services/kube-dns:dns/proxy
And now you have a cluster (albeit virtual) running on your computer! Isn't that cool?
Pods and Deployments
So now that our cluster is set up and running, we're ready to manually deploy an application and see some of the basic K8s objects that were touched on earlier. In a future article, I will cover a more complicated application, but for now, let's make use of the hello-node example that minikube uses. The image is available here.
The fundamental building block of Kubernetes is a pod. From the documentation, a pod is defined as:
A group of one or more containers (such as Docker containers), with shared storage/network, and a specification for how to run the containers.
In most basic applications, a pod will only run a single container. However, in more complex applications which group multiple containers to perform a single responsibility, the pod will act like a microservice. When you want to scale your application either temporarily during high load or permanently over time, identical pods can be created from your desired state definitions which can perform the same functions. You can imagine how tedious it would be to have to create more pods manually when your application is receiving increased traffic and then remove those pods once the traffic decrease. This is another huge benefit of Kubernetes: the option to automate scaling when required. So you don't typically create pods manually. Instead, you specify a deployment which is a type of basic controller that manages pods.
A very simple deployment of the hello-node image can be created by running:
kubectl create deployment hello-node --image=gcr.io/hello-minikube-zero-install/hello-node
Running kubectl get deployments allows us to see that our deployment is up and running. You'll see that the output also indicates the number of desired pods and the current pods. If there is an issue with your deployment, the current number of pods will not match your desired number. At this stage if you run kubectl get pods --watch or the shorthand kgp --watch and wait a couple of minutes, you should see something like:
kgp --watch
NAME                          READY   STATUS              RESTARTS   AGE
hello-node-6f6cbc4649-2h4rp   0/1     ContainerCreating   0          4s
hello-node-6f6cbc4649-2h4rp   1/1     Running             0          5s
This is great because now we know that our container has successfully been deployed in a pod using a deployment. There are a number of actions you can take to play with your deployment. One of the first to try is to delete the pod and see that the deployment creates another one to replace it.
kubectl delete pod $POD_NAME
Once your application and production requirements become more complicated, it will be easier to define the object using a .yaml file instead of using the cli alone. For example, if you want to specify config for your deployment or to request more than one replica of your pod specification. It is also easy to make changes to your deployment when you use .yaml, as you merely make the change to the definition and then run:
kubectl apply -f $YAML_FILE_NAME
Services
In order to actually use our application, we need to be able to access the node and the pod that the application is running in. If you've worked with Docker Compose before, you'll know that we can expose containers on a network and port to allow containers to communicate with one another and then use a reverse proxy like NGINX to forward external traffic to the correct service.
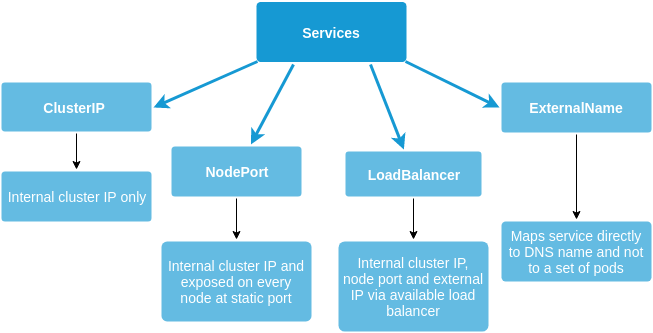
Similarly, Kubernetes has an abstraction called a service which defines which pods to access and how. The service will target the specific port at which the application is exposed by the target deployment and create an internal IP by which to access the deployment. Different types of services allow different levels of exposure.
Kubernetes has its own network proxy called kube-proxy which runs on every node. It is very similar to a reverse proxy which performs the function of forwarding traffic to the correct service, thus translating the Virtual IPs of the service into the actual IPs of the pods running the application.
This means that the internal or external requests being made to the underlying application (be it a backend, frontend, database, etc) do not actually need to know anything about the networking of the pods or nodes themselves. The pods can die and new ones can be brought up to replace them, but no manual intervention is required in order to handle the networking change to the new pods. This is another handy decoupling of objects which makes K8s so attractive and versatile.
Conclusion
This is hopefully a quick and high-level resource for getting started with Kubernetes using minikube. In the next article, we'll look at doing a similar setup using the Google Cloud Platform. This will be far more useful for real-world deployments and we'll also delve into setting up external, secure communication with the cluster which is important for accessing our application from a browser.
